Project planning
How to Cut Baseboard Corners: Coped, Mitered and Scarfed
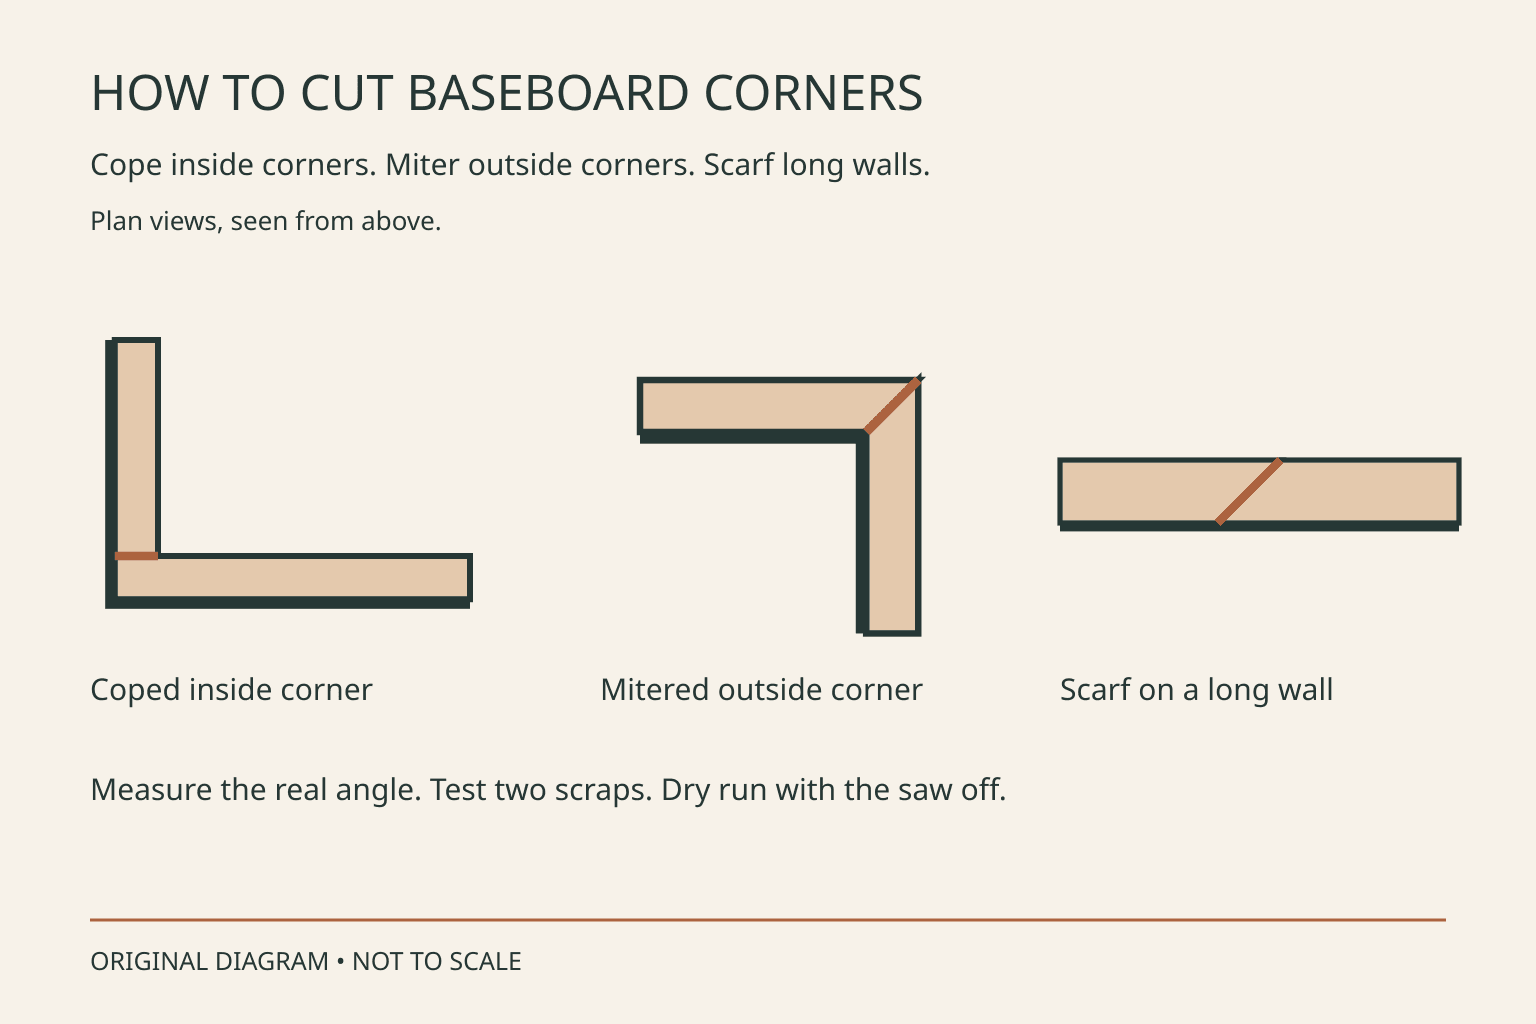
Cope or miter inside corners, miter outside corners and scarf long walls. Measure each angle, test two scraps and follow your own saw manual.
The quick answer
Cut baseboard corners by matching the joint to the spot. Inside corners are usually coped: one piece runs square into the corner, and the other is shaped to fit over its face. Two mirrored miters can also close an inside corner. Outside corners are mitered. Long walls are joined with a scarf joint, two angled ends that overlap. That is the layout Fine Homebuilding’s John Spier describes.
Before any full-length cut, measure the real corner angle and test two scraps in place. DeWalt’s DWS779 manual says to make a dry run without power before making any cuts. This guide is based on desk research of the manuals and trade articles listed at the end, checked October 26, 2026. We did not cut or install test joints for it.
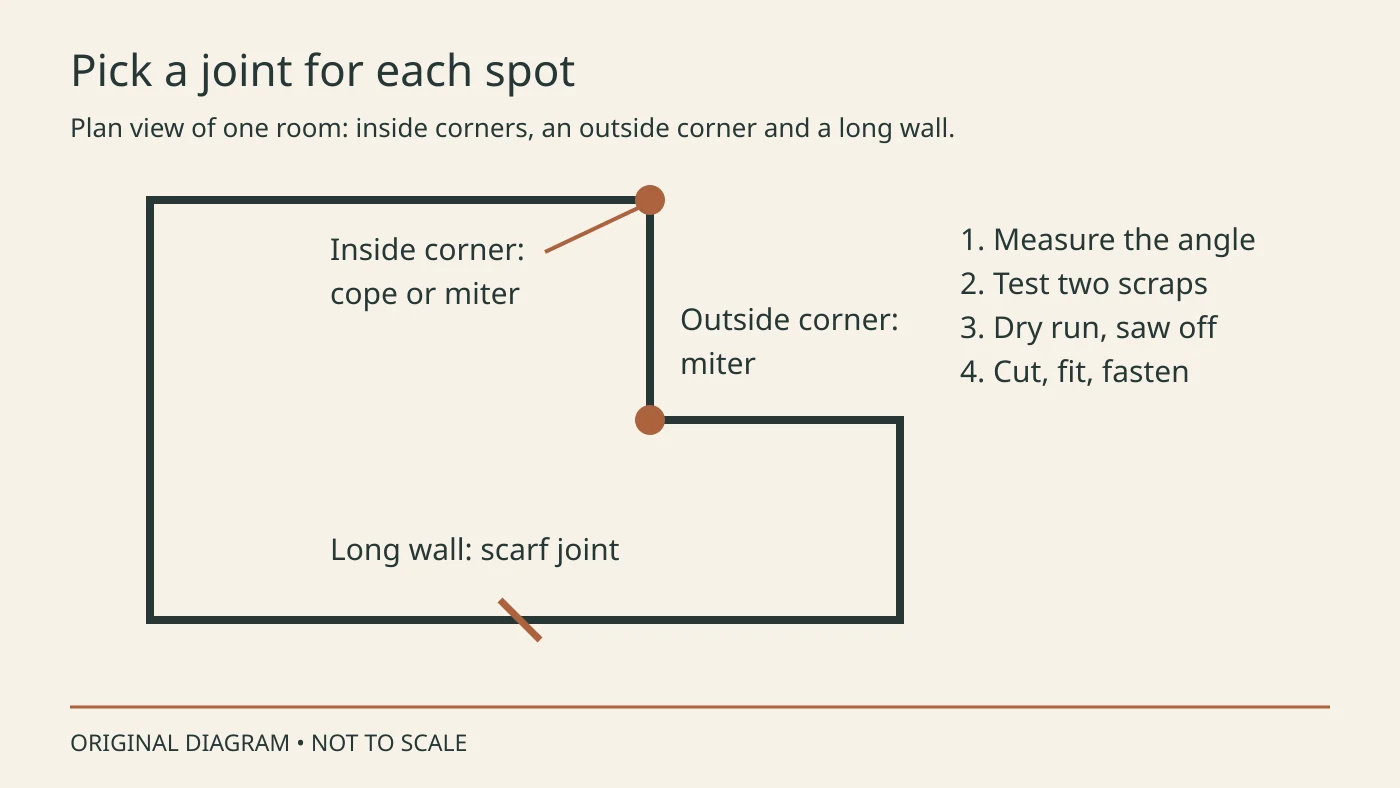
- Sketch the room and mark each corner as inside, outside or a long-wall splice.
- Measure every corner angle; Royal Building Products warns that angles can change from corner to corner.
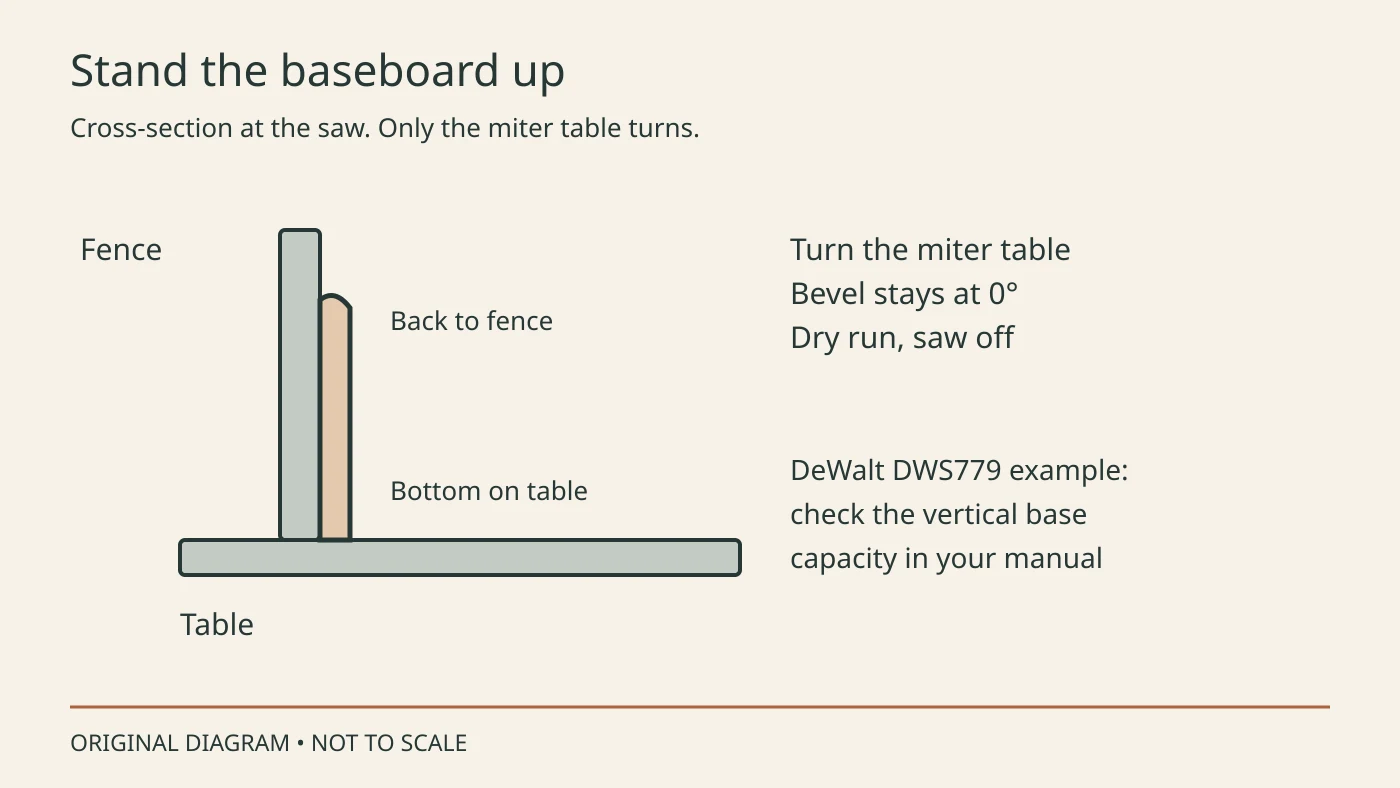
- Stand the baseboard with its back against the fence and its bottom on the table.
- Make a dry run with the saw off, then test two scraps in the actual corner.
- Cut the full pieces, fit them, then fasten.
How this guide has been updated
- Article published with sourced corner, splice and return methods and original diagrams. No product picks; research-based, no hands-on testing.
Share this page
Use this article with our best miter saw shortlist, then check the safe operating guide before planning the cut.
Choose the right joint for each corner
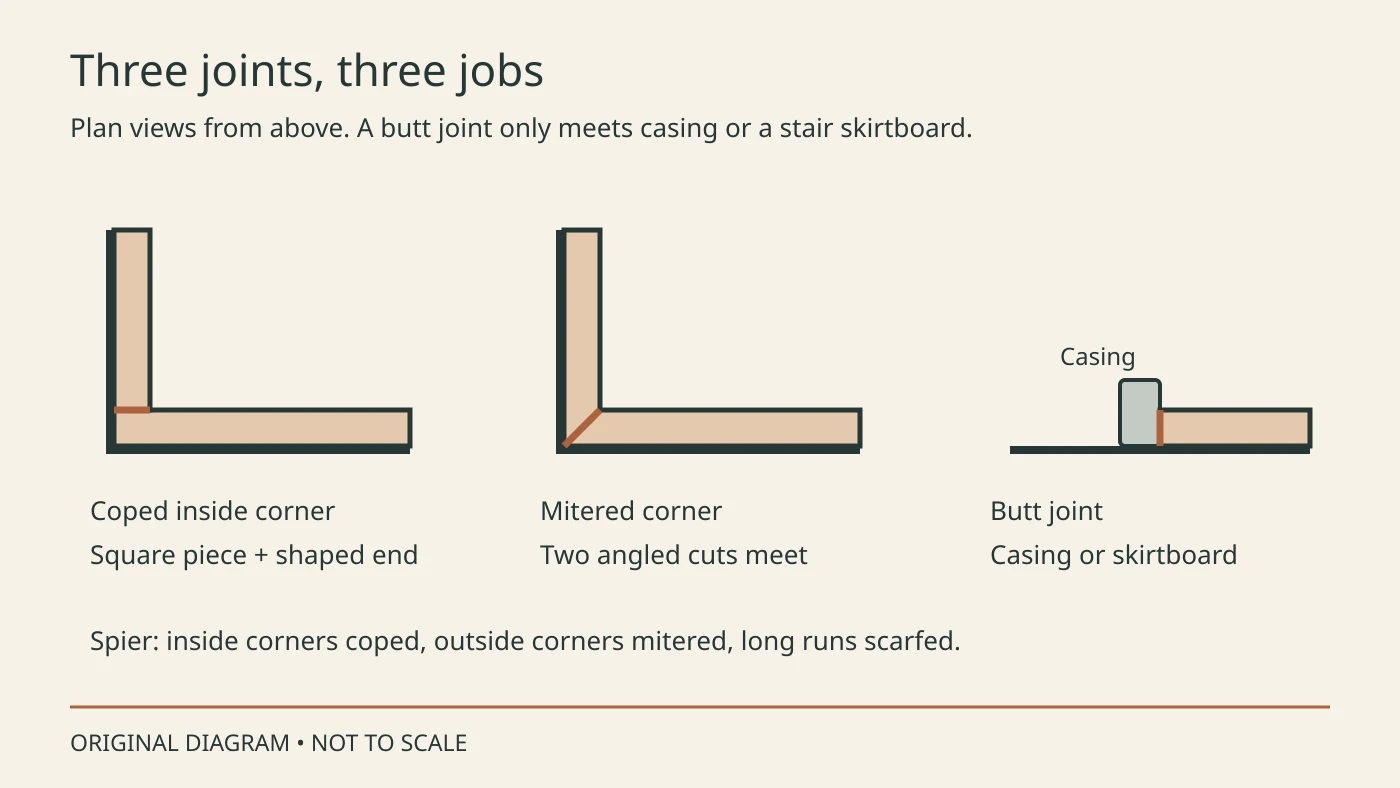
Spier’s rule is short: inside corners are coped, outside corners are mitered, and long runs get scarf joints. Simple butt joints, two square ends meeting, are enough where baseboard meets stair skirtboards or door casings. In most simple trim jobs he runs baseboard to the outside of the casings, so the casings go in first.
Coping is more forgiving at inside corners. Gary Katz explains why in Fine Homebuilding: “For a crisp joint line, miters have to line up exactly in a corner. If the coped piece is off plumb slightly or not quite square to its neighbor, it’s harder to detect.” Spier also calls coped joints “quite forgiving.” He leaves them unglued, because a coped joint is meant to allow a bit of movement.
A mitered inside corner can still suit simple trim in a corner you have measured. Our guide to cutting molding inside corners covers the general miter-or-cope choice for all trim, including crown. This page stays with baseboard.
Measure the corner angle first
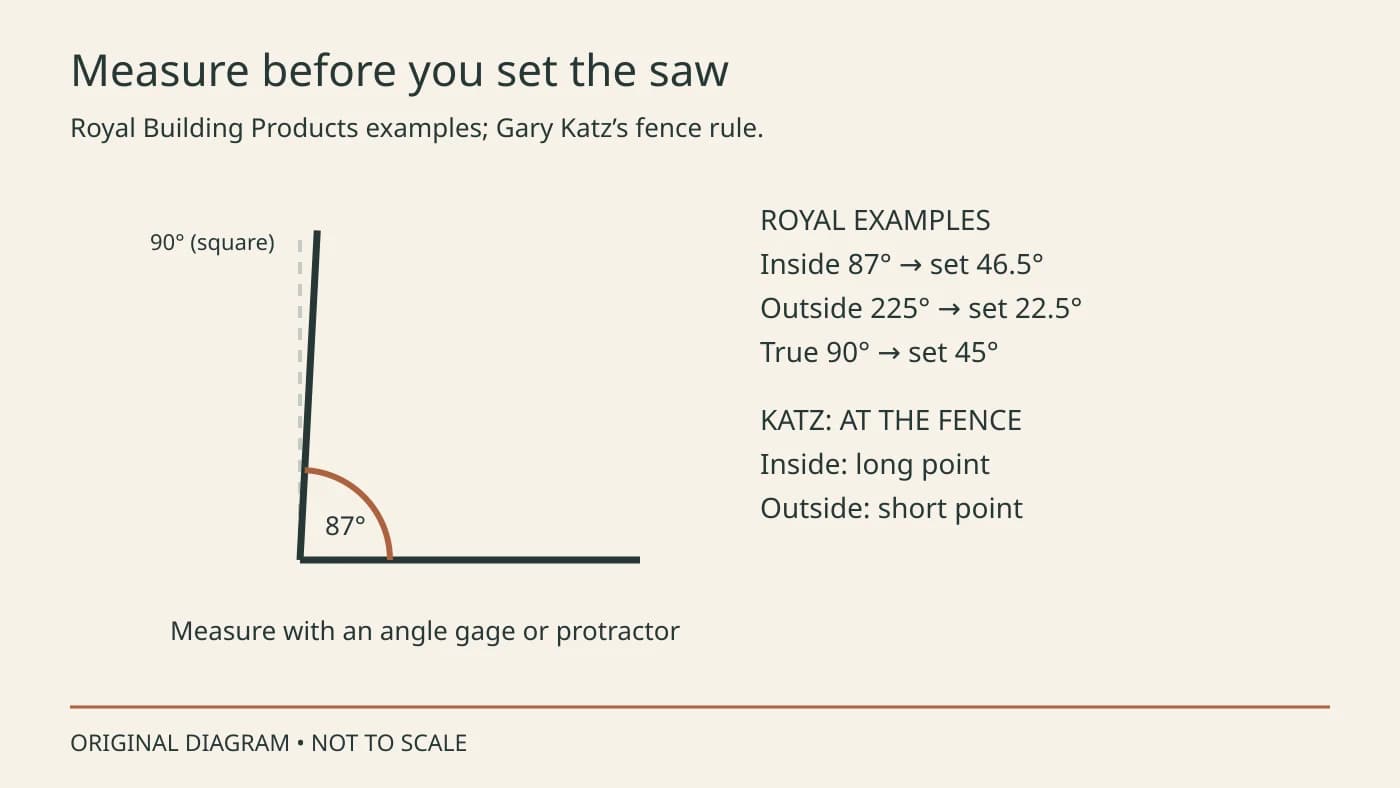
Do not assume a corner is 90 degrees. Spier writes that corners are often not exactly square and baseboard isn’t always exactly plumb, meaning straight up and down. Katz puts it plainly: “Outside corners aren’t always 90°, so be sure to check the angle of the corner with a protractor.” Royal Building Products says wall angles in a house can be off by as much as 3 degrees.
An angle gage is a tool that reads the corner angle. Royal’s angle chart then turns that wall angle into a saw setting. A true 90-degree corner gives 45 degrees. In Royal’s inside-corner example, a corner of 87 degrees needs a 46.5-degree setting. In its outside-corner example, a 225-degree corner needs 22.5 degrees. Both pieces get the same setting, turned in opposite directions. Our guide to figuring out miter angles and our miter angle calculator show the math.
Katz uses two rules at the saw instead of picturing the joint. For inside corners, the long point of the cut is always against the wall and the fence. For outside corners, the short point is always against the wall and the fence. The long point is the tip of the angled cut that reaches farthest along the board.
Set baseboard on the miter saw
Cut baseboard standing up. DeWalt’s DWS779 manual says all base molding cuts should be made “with the back of the molding against the fence and with the bottom of the molding against the table.” Royal calls this the vertical position and uses it for baseboard and splice cuts. You set the angle by turning the miter table. DeWalt’s base molding table lists miter settings only, so the bevel, or blade tilt, stays at 0 degrees.
Height can stop the job. Tall baseboard may not fit standing up, and the DWS779 manual lists vertical base limits for that saw only. Look up the vertical baseboard capacity listed for your own saw before you plan the cuts. Our miter saw for baseboards guide compares saws by baseboard height.
DeWalt’s table also says which side of the cut to keep. Here is its 45-degree example for the DWS779. Left and right can be set up differently on other saws, so check your own manual before you copy it.
- Inside corner, left piece: miter left 45°, save the left side of the cut.
- Inside corner, right piece: miter right 45°, save the right side of the cut.
- Outside corner, left piece: miter right 45°, save the left side of the cut.
- Outside corner, right piece: miter left 45°, save the right side of the cut.
How to cope baseboard inside corners
Coping means shaping the end of one piece to match the face of the other. Royal describes it as transferring the profile of one piece of trim to the end of another. Start by cutting the first piece square and fitting it tight into the corner.
Cut the second piece at 45 degrees, as if it were mitered for an inside corner. That cut exposes the profile line along the face. Spier then flips the board on edge and plunges the miter saw down the straight part of the profile, with the blade set at about a 5-degree back bevel. A back bevel removes wood behind the visible edge. He cuts the decorative part with a coping saw and cleans up with a sharp chisel or a rasp. In his words, “only the top edge of the profile needs to be square and precise.”
That plunge cut is Spier’s method. Use it only if your saw manual allows the setup and you can clamp the board with your hands out of the blade zone. Otherwise, cut the whole profile with the coping saw. Katz’s advice for the coping saw: “keep the sawblade moving. Don’t try to cut quickly, and don’t push too hard on the blade.” He also leaves the thin sliver at the top of the cope at least 1/8 in. thick, because a thinner sliver breaks off easily. That thicker sliver overlaps the square piece, so Katz notches the square piece to accept it. With the coped piece pressed tight in place, he plunges a utility knife into the top of the square piece, using the edge of the miter cut as a guide. Then he removes the coped piece, cuts a notch just deep enough for the sliver and sets the coped piece in for good.
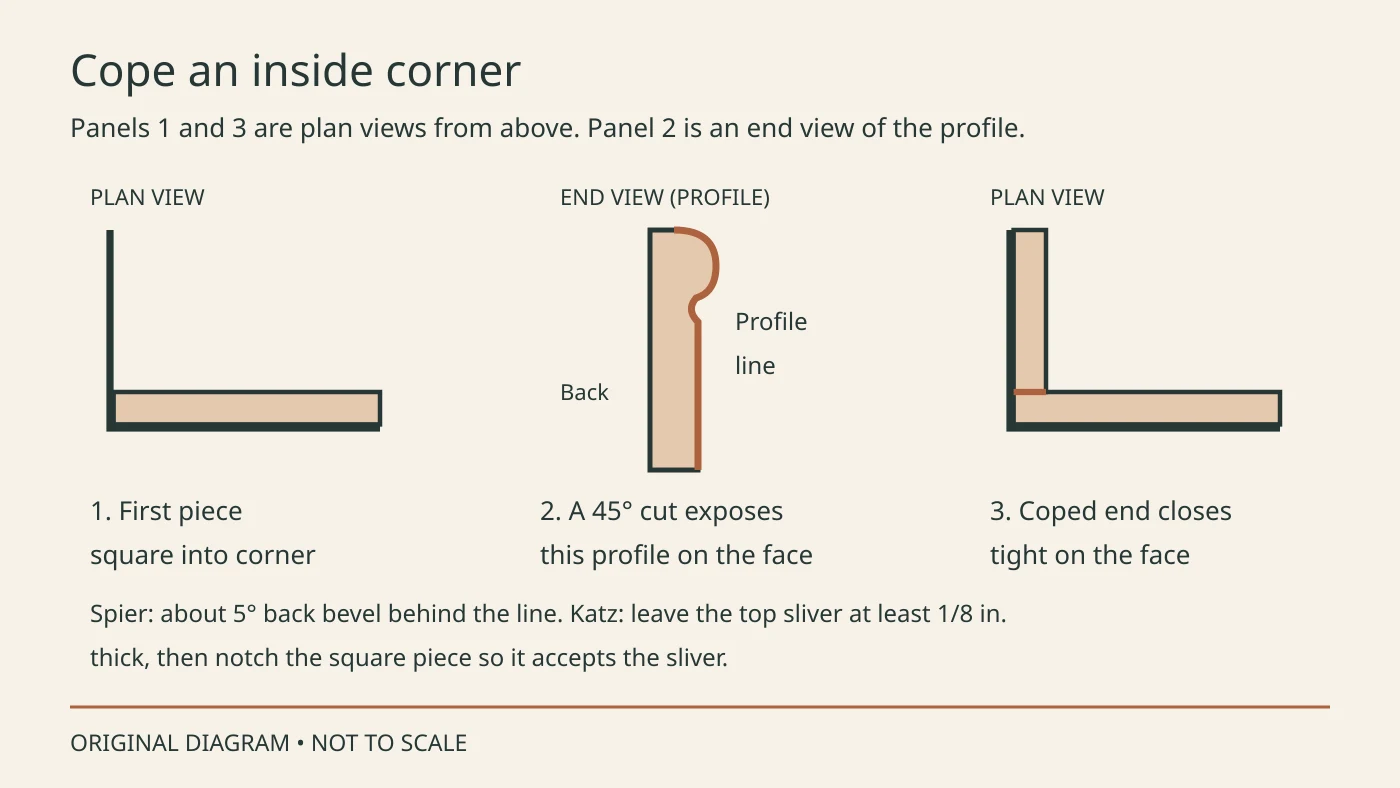
- Cut the first piece square and fit it into the corner.
- Cut the second piece at 45° to expose the profile line.
- Remove waste behind the line with a slight back bevel.
- Follow the line with a coping saw; clean up with a chisel or rasp.
- Test the cope against the first piece before you nail.
How to miter baseboard inside corners
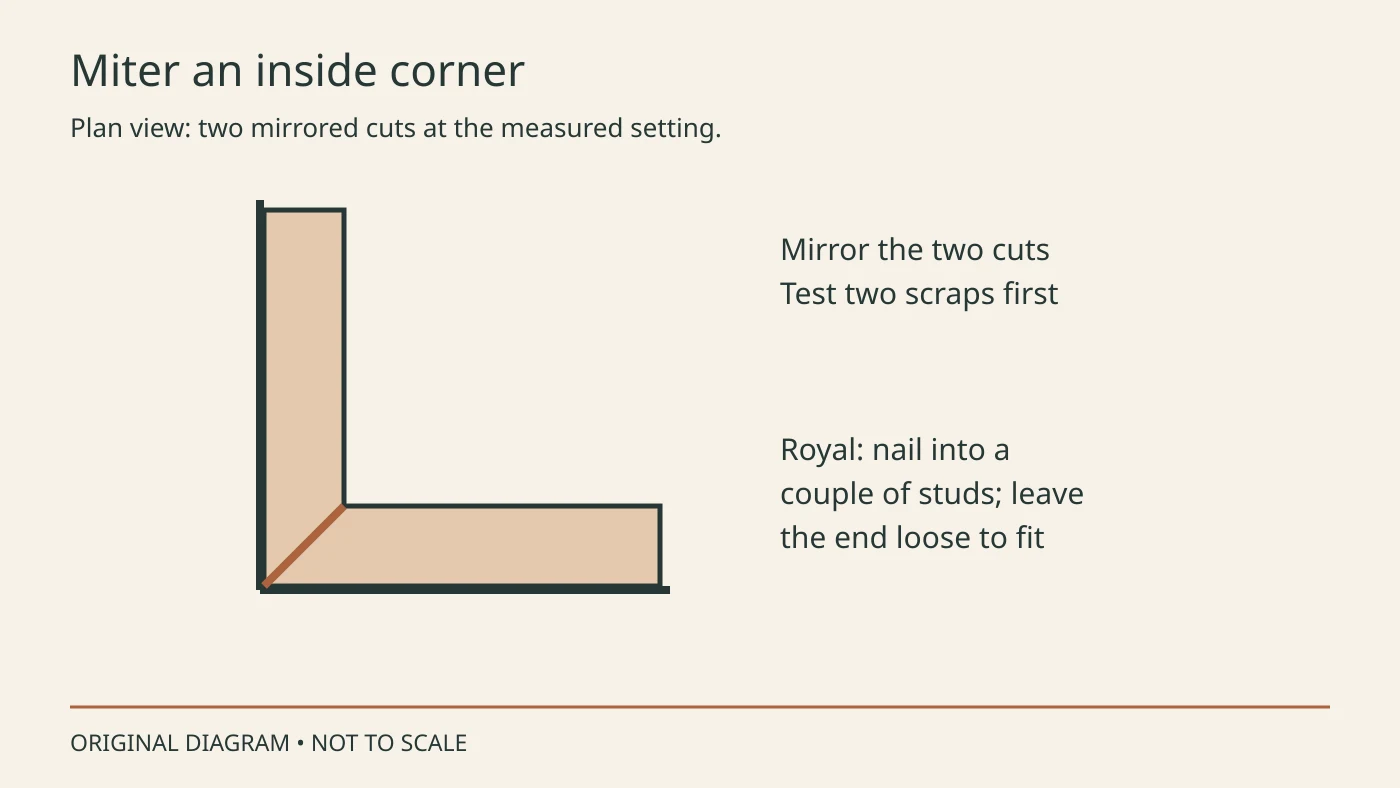
If you miter an inside corner instead, cut two mirrored ends at the setting you measured. In Royal’s example, the first piece is cut at 46.5 degrees, the wall is measured and the length is marked. The mating piece is then cut with the table turned the other way to the same 46.5-degree setting.
Test two scraps in the corner first. Royal suggests fastening the trim to a couple of studs and leaving the end loose to help fit the miter joint. It also says to be certain of the angles “because they could change with each corner.” If the scraps leave a gap, recheck the corner angle as shown above before cutting full pieces.
How to cut baseboard outside corners
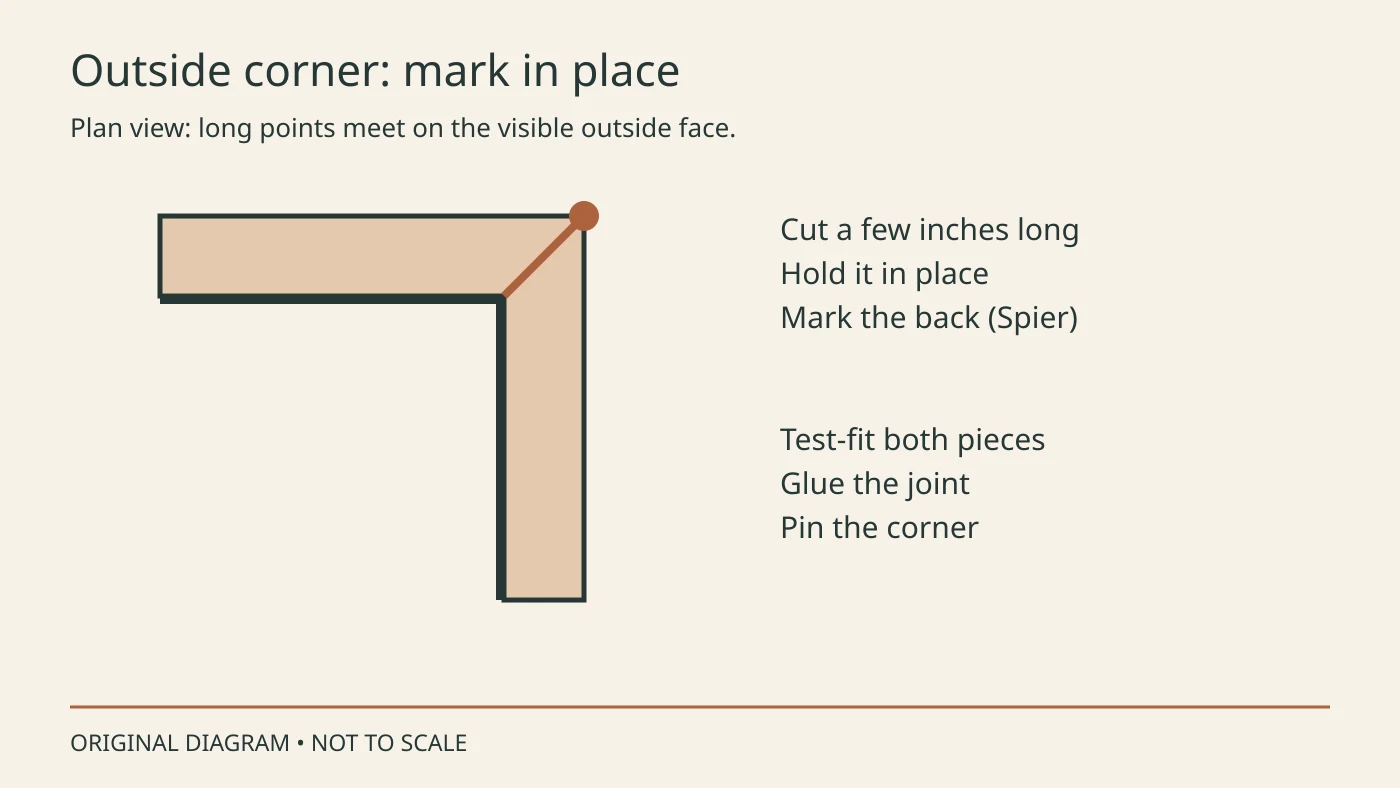
Outside corners are mitered, with the long points meeting on the visible outside face. Spier does not measure these pieces. He cuts them a few inches long, holds each one in place and scribes, or marks, the cutline on the back. He marks both pieces before fastening either one.
For problem corners, Spier tests the angles with two scrap pieces. Once the pieces form a tight corner, he fastens the first one, runs carpenter’s glue along the joint, installs the second piece and pins the corner with a brad nailer. Katz also says to always test-fit outside corners before nailing them, and to wipe off excess glue so it stays off the finished face.
Join long walls with a scarf joint
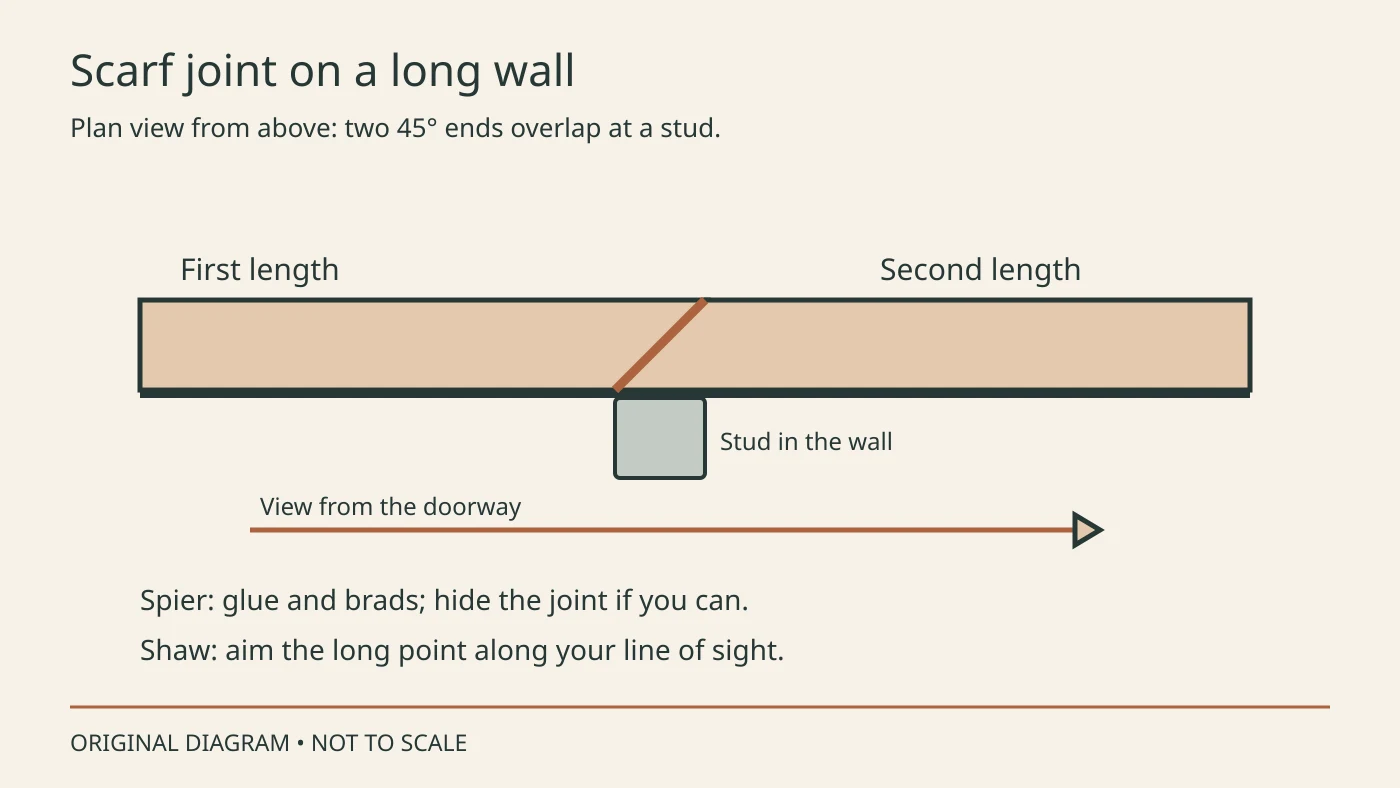
When a wall is longer than one piece of baseboard, join two pieces with a scarf joint. Spier describes it as “two pieces cut with 45° bevels so that the one piece overlaps the other.” Royal calls the same idea a splice miter. It cuts the trim standing up at 45 degrees, then cuts the mating piece in the opposite position without changing the setting.
A scarf beats a square butt joint here. Spier says scarf joints don’t tend to separate like butt joints, and they look smoother. Royal adds that the angled joint gives more surface area for glue. Spier breaks the run on a stud, preferably where the joint will be hidden, such as behind furniture. He tacks both pieces in place first, then glues and pins the joint with a brad nailer.
Shaw’s laminate molding instructions add a rule for direction: cut the molding with the long point “oriented in the same direction as your natural line of vision when you enter the room.” Stand in the doorway, look along the wall and mark that direction on both pieces before you cut.
Returns and small baseboard pieces
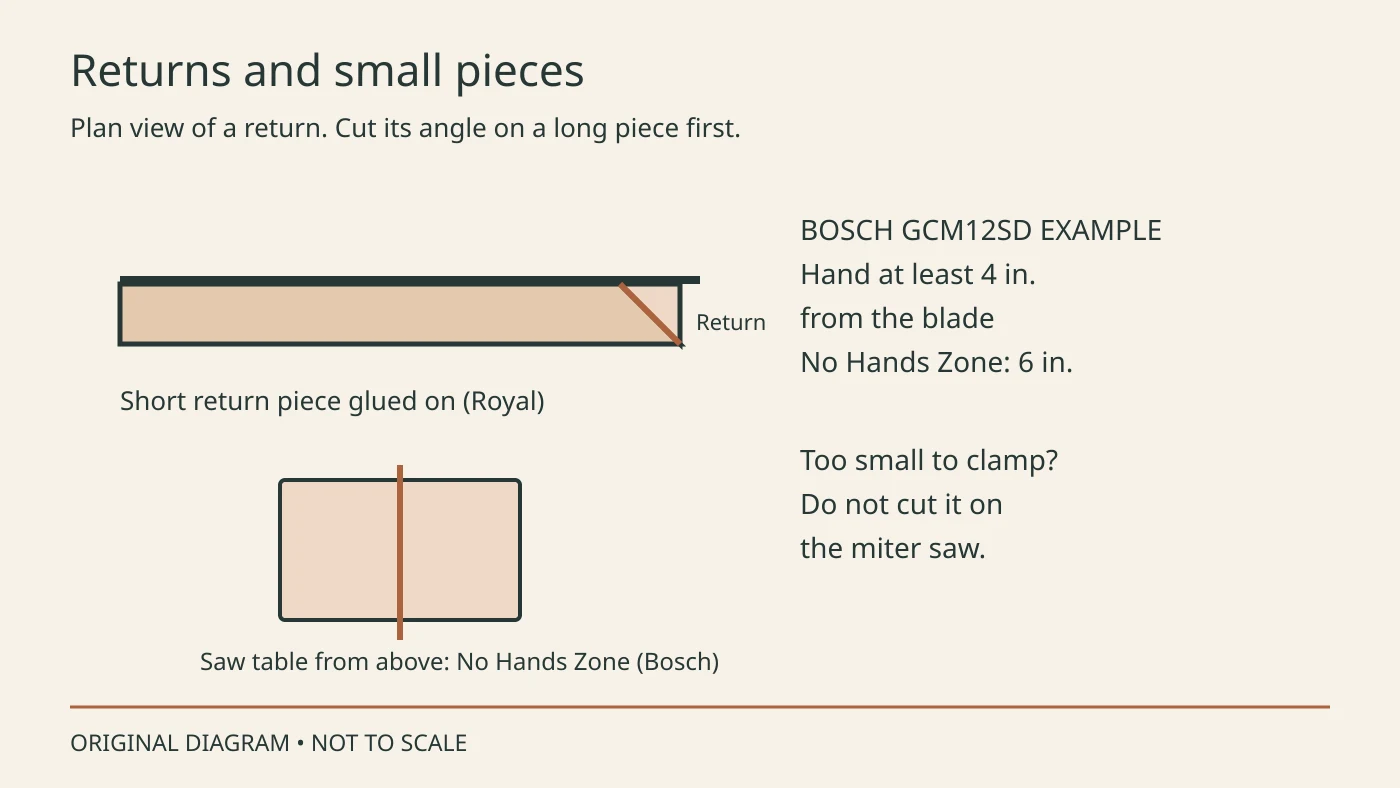
A return closes an exposed end where trim stops. Royal cuts the trim as though it were turning an outside corner, then cuts a short piece to mate with that end and glues the short piece to the long piece. The thickness of the trim sets the length of the short piece.
The short piece is the risky cut. Bosch’s GCM12SD manual states: “Do not use this saw to cut pieces that are too small to be securely clamped or held by hand.” Its general rule keeps a supporting hand at least 4 inches (100 mm) from either side of the blade. Its model-specific No Hands Zone is 6 inches to each side of the blade path. These are Bosch examples; follow the rules in your own saw manual. OSHA’s miter-saw guidance warns that hands can slip off the work toward the blade.
Cut the return angle on the end of a long board first, so you are holding the long board. If the final cut would free a piece you cannot clamp, or hold with your hand outside the required zone, do not make it on the miter saw. Our guide to cutting small pieces on a miter saw covers that decision.
Small filler pieces, such as a short length between a door casing and a corner, bring a second problem. Spier says most cannot be nailed without danger of splitting, but the next piece can often hold them in place. Katz installs pieces up to about 2 in. wide first and lets the intersecting board hold them. Spier also puts a slight back bevel on a small piece so it slips into an uneven corner.
Install baseboard in the right order
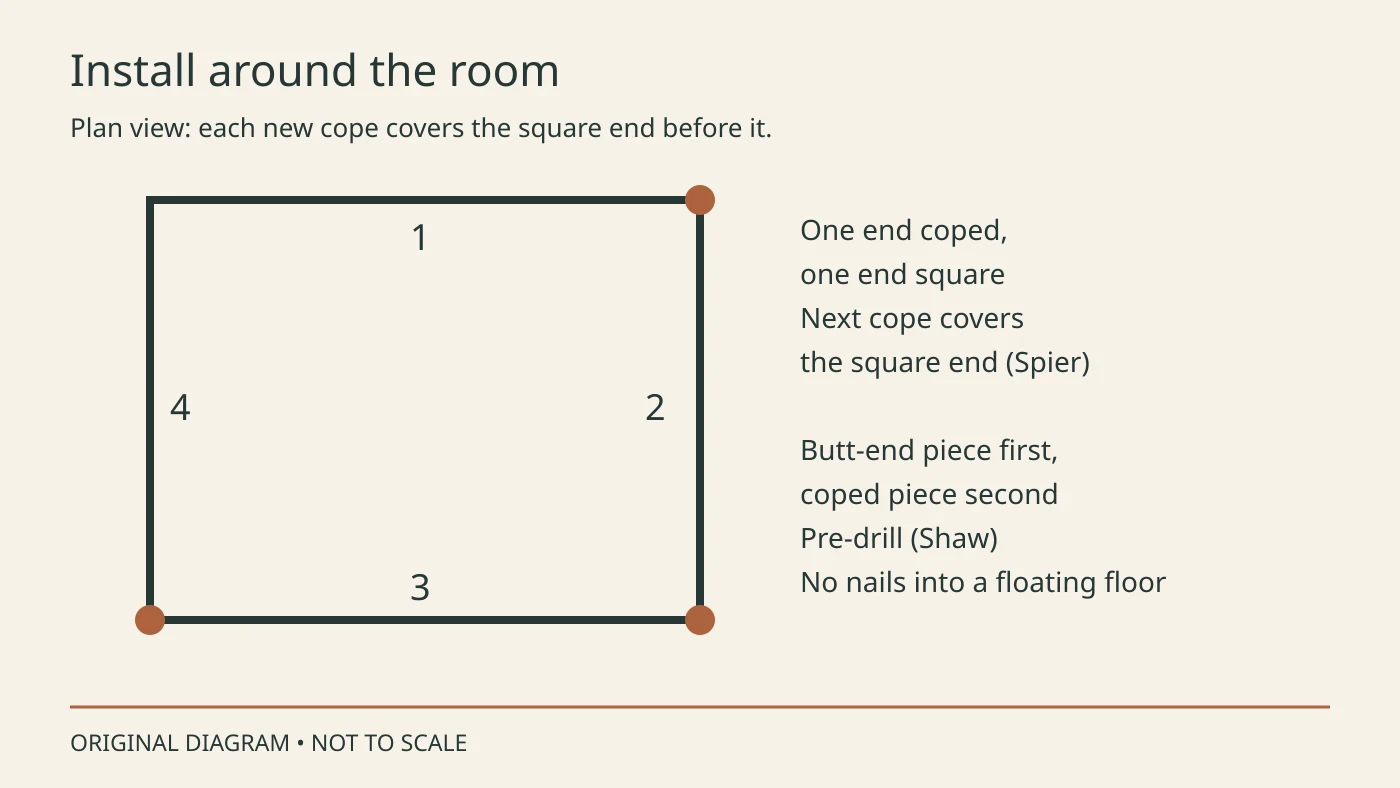
Work around the room so each joint covers the one before it. On Spier’s jobs, only one end of each piece is coped. After the cope is cut, he measures the length and cuts the other end square. If that square end goes to a corner, the next piece’s cope covers it.
Katz gives the order for each coped corner: “In a coped corner, always install the butt end piece first. Then slip in the coped piece.” He spreads the cut pieces around the room near where they go and installs them in roughly the order he measured them.
Shaw’s molding instructions say to pre-drill molding wherever it will be nailed or fastened, to avoid splitting. Shaw also says never to fasten wall base to its floating laminate floor. That is Shaw’s advice for its laminate; follow the instructions for your own floor. If you add quarter round or base shoe at the floor, our quarter round guide covers those cuts.
At a glance
When coping pays off
- Inside corners on profiled baseboard, where Spier and Katz both cope.
- Corners slightly off plumb or out of square, per Katz.
- Joints that should move a little; Spier leaves copes unglued.
When a miter is enough
- Outside corners, which Spier and Katz both miter.
- Long-wall splices, cut as 45° scarf joints.
- Returns, which Royal cuts like an outside corner.
- Simple trim in a measured corner, once two scraps fit.
Frequently asked questions
Should you cut baseboard corners at 45 degrees?
Only for a true 90-degree corner. Royal’s chart gives 45 degrees for a 90-degree corner but 46.5 degrees for an 87-degree corner. Measure each corner and test two scraps first.
Do you need to cope baseboard?
No, but it often helps at inside corners. Katz notes that a coped joint hides a slightly off-plumb or out-of-square piece better than a miter. Outside corners are still mitered.
What tool do I need to cut baseboard corners?
A miter saw for square and angled cuts, plus a coping saw if you cope. Royal also lists an angle gage, safety glasses and glue. Check that your saw manual lists enough vertical capacity for your baseboard height.
How do you cut outside corners on baseboard?
Miter both pieces so the long points meet on the outside face. Spier cuts each piece a little long, holds it in place and marks the cut on the back. Test-fit, glue the joint and pin the corner.
How do you join baseboard on a long wall?
Use a scarf joint: two 45-degree ends that overlap. Spier places it on a stud, ideally where furniture will hide it, then glues and pins it. Shaw points the long point along your view from the room entrance.
Sources and verification
Specifications and material guidance were checked on the dates shown. Always confirm the current manual for your exact saw, blade and decking product.
- Fine Homebuilding: Installing Baseboard, by John SpierChecked October 26, 2026
- Royal Building Products: moulding installation tipsChecked October 26, 2026
- DeWalt DWS779: instruction manualChecked October 26, 2026
- Fine Homebuilding: Baseboard Done Better, by Gary M. KatzChecked October 26, 2026
- Shaw: installing laminate floor moldingsChecked October 26, 2026
- Bosch GCM12SD: operating and safety instructionsChecked October 26, 2026
- OSHA: miter-saw guarding and safetyChecked October 26, 2026