Project planning
How to Cut Quarter Round: Corners, Returns and Splices
Keep the two flat sides supported, test corner cuts in scrap, and keep fasteners out of the floor. Here is how to plan corners, returns and long runs.
The quick answer
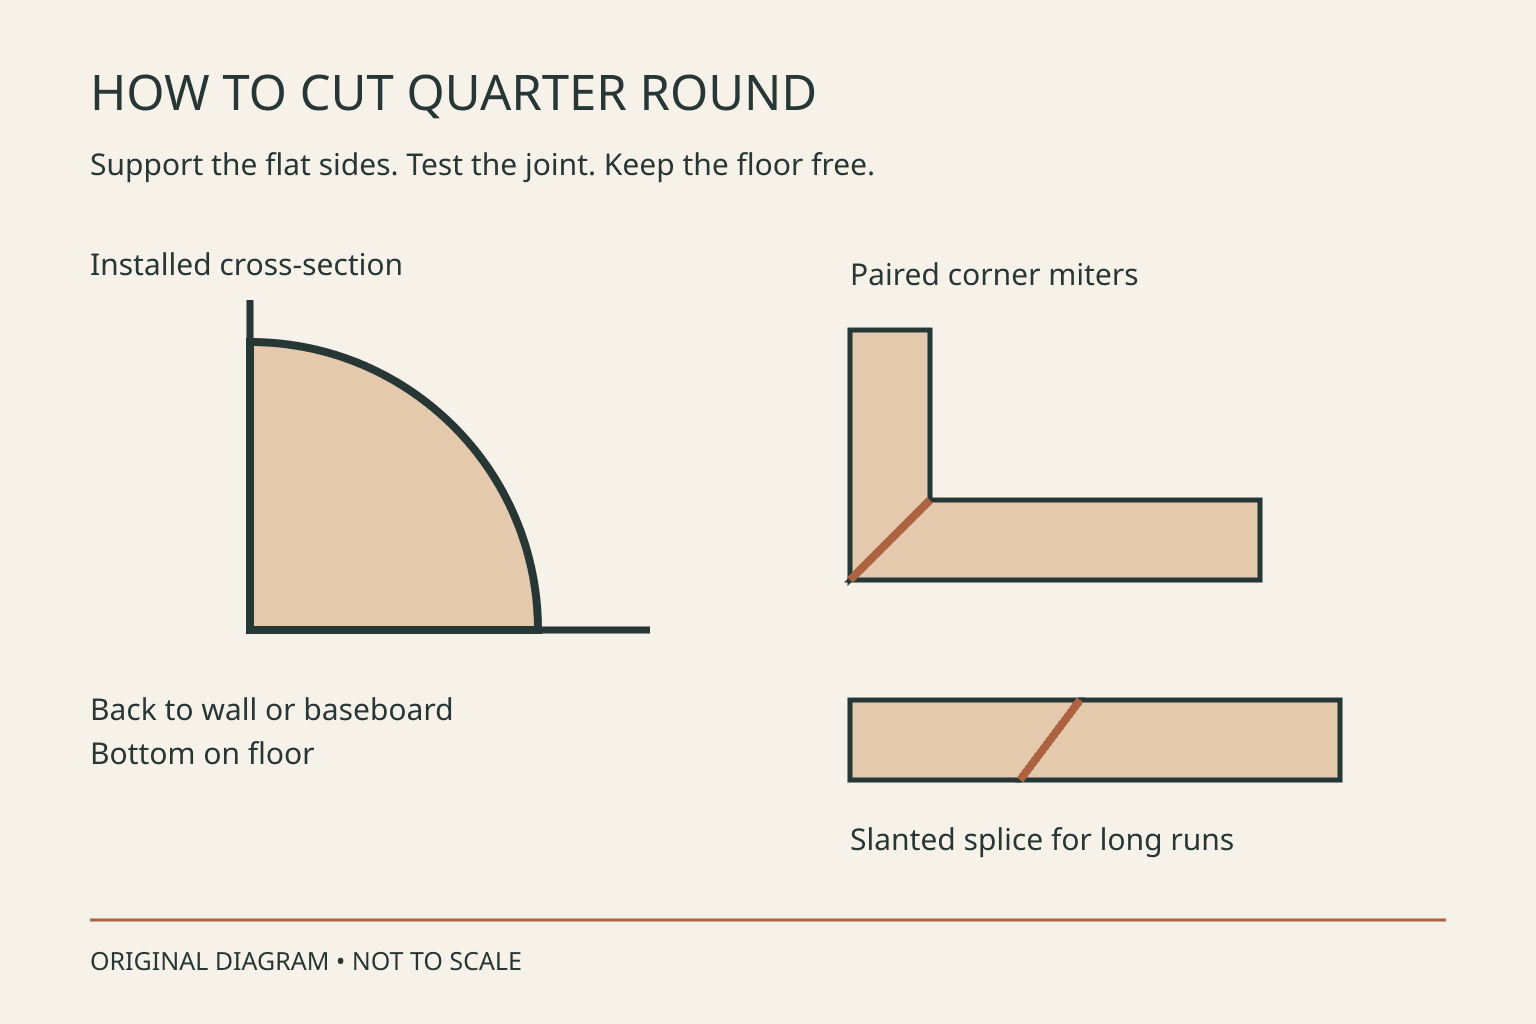
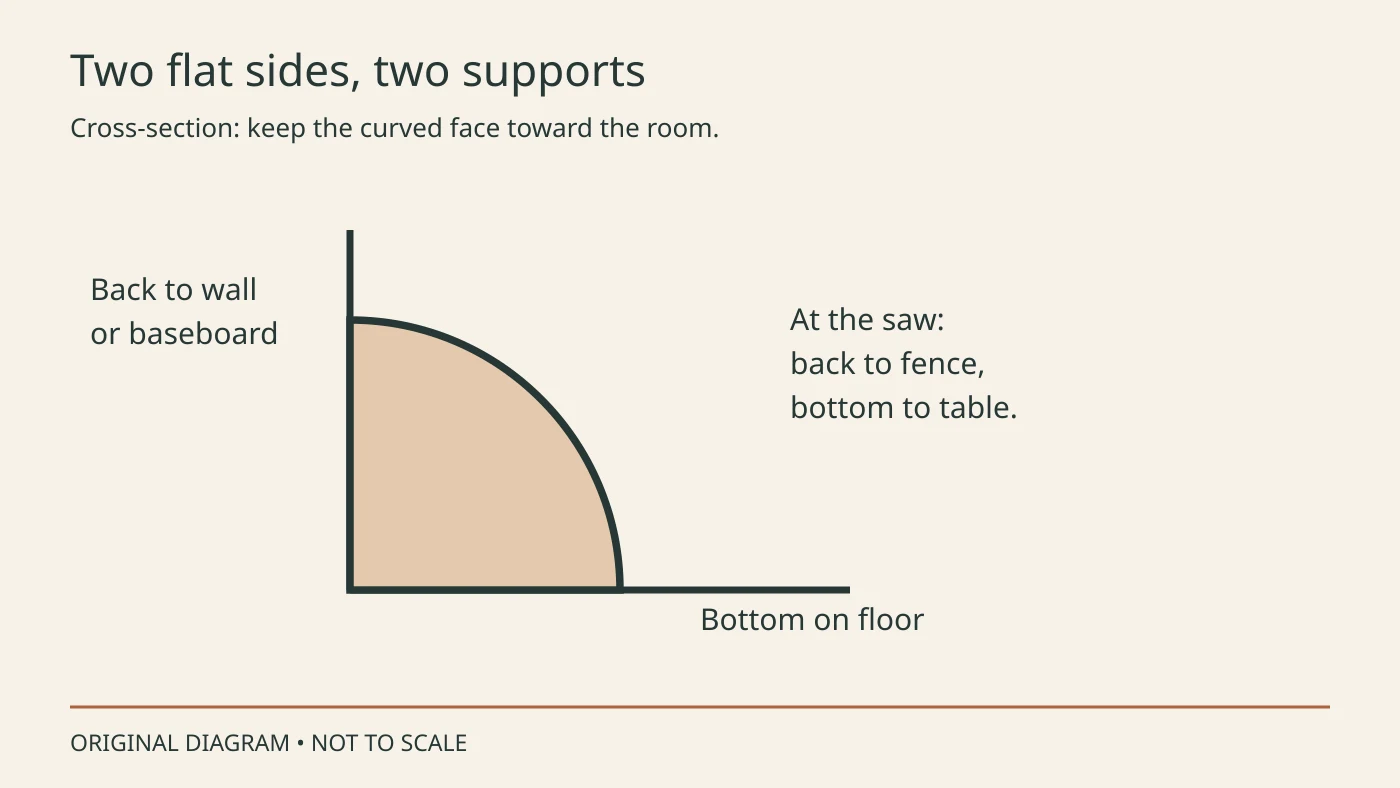
Cut quarter round with its two flat sides supported: back against the saw fence and bottom on the table, just as it sits against the baseboard and floor. For a true 90-degree corner, start with two mirrored 45-degree miter cuts. A miter is an angled end cut made by turning the saw table; keep the bevel, or blade tilt, at 0 degrees.
Test two scraps in the actual corner before cutting full lengths. Following Shaw’s laminate molding instructions, use angled splices on long runs and fasten to the wall or baseboard, never the floor. Make a tiny return only if you can meet your saw manual’s workholding and hand-distance rules. This article is based on desk research of the listed flooring, molding and saw sources, checked October 19, 2026; no hands-on test was performed for this article.
- Mark each piece left or right, its finished length and the waste side.
- Set the miter angle; leave the bevel at 0 degrees for these upright cuts.
- Check support, clamp clearance and hand distance with the saw off, as Bosch directs.
- Test paired scraps in the room, then cut the full pieces.
- Follow your flooring maker’s fastening instructions; keep fasteners out of the floor.
How this guide has been updated
- Article published with product references and related reading.
Share this page
Use this article with our best miter saw shortlist, then check the safe operating guide before planning the cut.
Relevant options
Two compact saws to compare for trim-sized cuts
Research-based recommendations, not hands-on tests. Compare the exact model, package and manufacturer specifications before ordering.
24-pound option with vise included
Metabo HPT C10FCG2
Best for: A trim station where Metabo HPT’s listed 24-pound weight and included vise suit the work plan.
- Metabo HPT: 24 lbs; nine miter detent stops
- Metabo HPT: 2x6 at 90°; 2x4 at 45°
- Metabo HPT: vise assembly and 40-tooth wood blade included
Review context: Metabo HPT lists nine miter detent stops, 52° left/right miter travel, 0–45° left bevel and a shadow line. The included blade is a 40-tooth TCT blade for wood.
Consider: Metabo HPT lists left bevel only. The included vise still needs checking with the actual strip and cut path.
Official specificationsChecked October 19, 2026
20V MAX compact sliding option
DeWalt DCS361B
Best for: A room-to-room plan that suits DeWalt’s 20V MAX battery system and listed 30-pound saw weight.
- DeWalt: 20V MAX 7-1/4-inch sliding saw
- DeWalt: 30 lbs; 11 positive stops
- DeWalt: battery and charger sold separately
Review context: DeWalt lists a 7-1/4-inch sliding saw with 11 positive stops, 3-1/2-inch vertical base capacity and 3-5/8-inch nested crown capacity.
Consider: Its 7-1/4-inch blade is smaller than Shaw’s recommended 10- or 12-inch sizes. DeWalt sells the DCS361B tool only: battery and charger are separate. Verify the workholding setup for narrow trim.
Official specificationsChecked October 19, 2026
What quarter round covers
Quarter round has a curved front and two flat sides that meet at a right angle. The back sits against the wall or baseboard; the bottom sits on the floor. Tarkett’s laminate guide uses this trim to cover the expansion gap, the open space left around a floating floor so it can move. The trim covers that space without fastening the floor down.
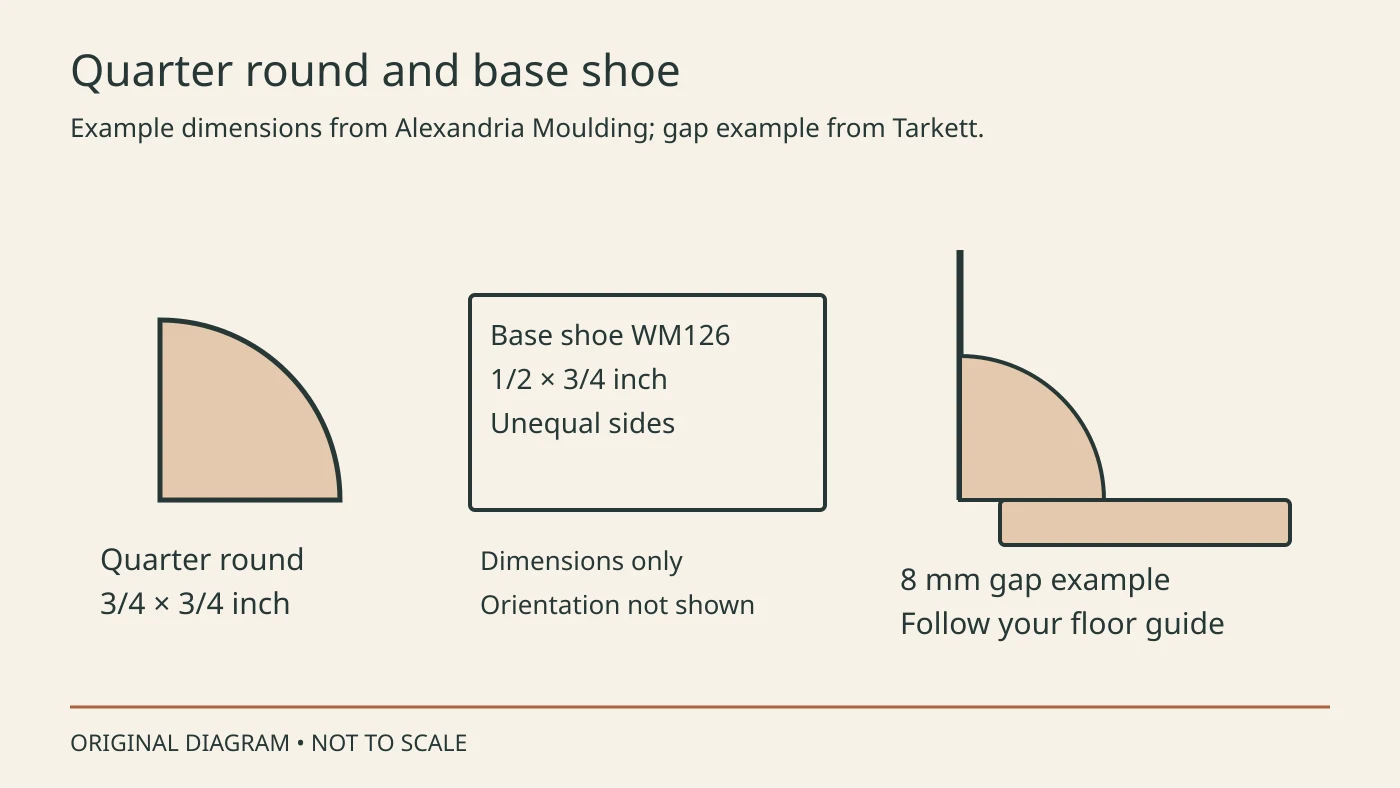
Tarkett says the molding must cover its 8 mm (5/16-inch) expansion area. That is a Tarkett example, not a gap size for every floor. Read the instructions for your exact flooring before choosing trim width. A piece that looks right but leaves the required gap exposed does not do the job.
Quarter round and base shoe are related shapes, but the names do not promise the same dimensions. In Alexandria Moulding’s catalog, quarter round has equal width and height, including 11/16 x 11/16 and 3/4 x 3/4 inch. Its WM105 product page also lists 3/4 x 3/4 inch. Base shoe profiles such as WM126 are listed as 1/2 x 3/4 inch, so the two sides are not equal. Compare the actual profile instead of assuming one standard size.
Set quarter round on the saw
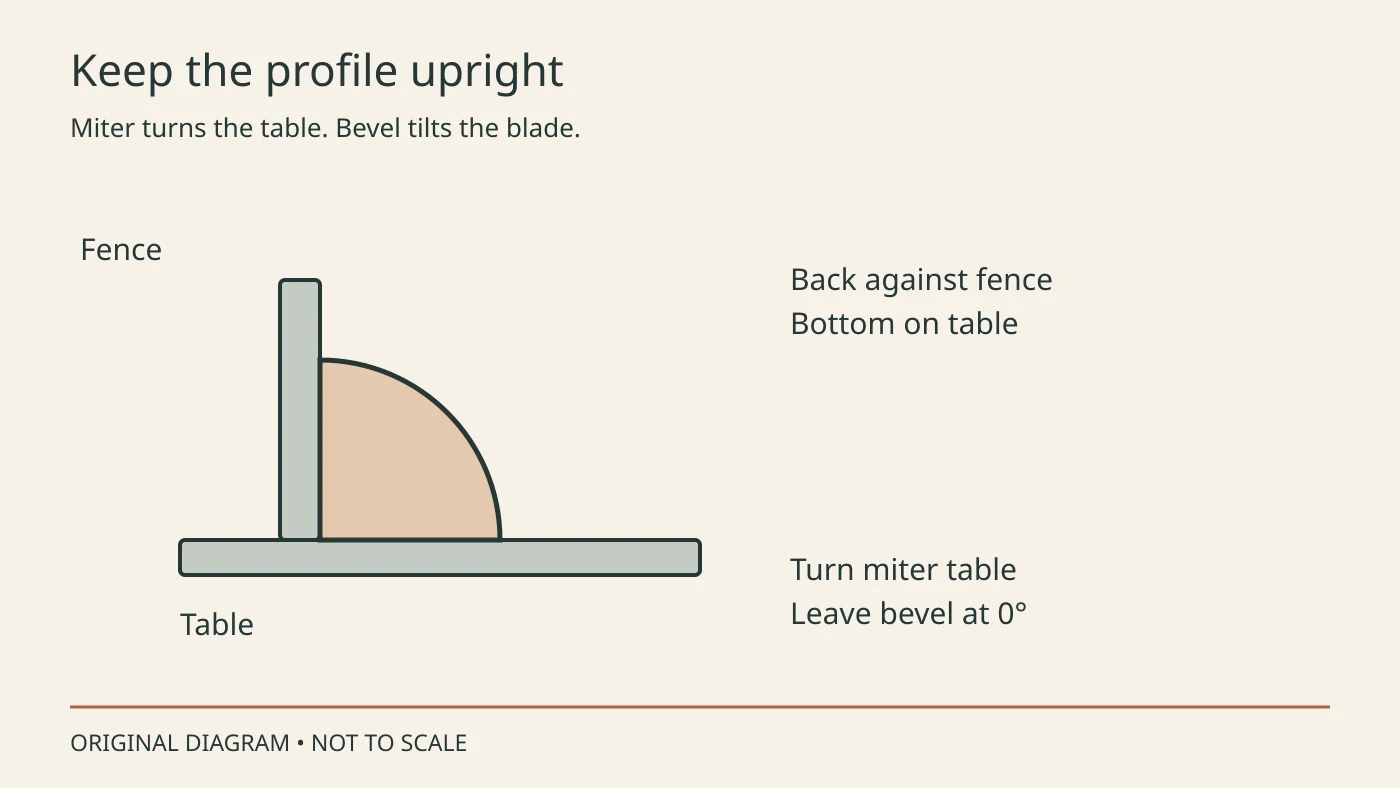
Use the two flat faces as support faces: back to fence, bottom to table. Do not roll the curved face down. Keep that same orientation when you move from the left-hand piece to the right-hand piece.
A miter is made by turning the table. A bevel is made by tilting the head. For the ordinary 90-degree room corners shown here, turn the miter table and leave the bevel at 0 degrees. Our guide to cutting a 45-degree angle on trim explains that control difference in more detail.
Shaw’s laminate molding instructions say the blade should be “positioned to cut into the finished face.” Check the finished surface and blade entry before cutting; do not use that advice as a reason to balance the trim on its curve. Label the left and right pieces and mark an X on the waste side so the angled offcut is clear.
OSHA’s miter-saw guidance calls for eye and face protection and hands kept away from the blade.
Bosch’s GCM12SD manual calls for a simulated cutting cycle with the saw off. Rehearse the full motion before a powered cut and check that the guard and clamp clear the work. Use the support and hand positions required by your own saw manual.
How to cut quarter round inside corners
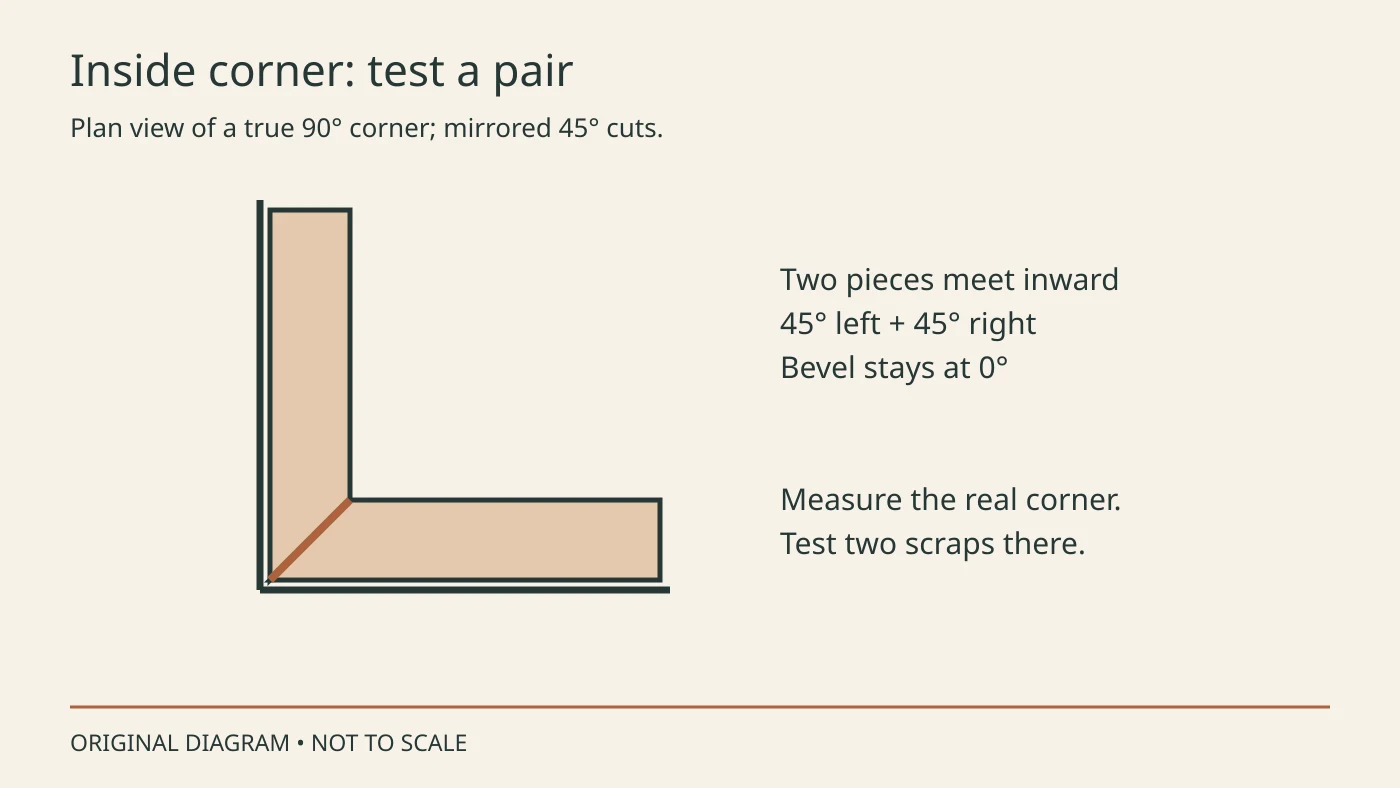
Two mirrored 45-degree cuts are the starting point for a true 90-degree inside corner. An inside corner is the inward meeting of two walls. Keep the back against the fence and the bottom on the table for both pieces; reverse the miter direction for the mating end.
Measure the actual room corner before choosing the setting, then fit two scrap pieces there. If the joint opens, check the angle and whether both scraps sit in their installed position before trimming again. Our guide to figuring out miter angles covers the angle calculation; do not force a 45-degree setting onto a corner that is not square.
As an alternative joint layout, our inside-corner guide explains coping: shaping one piece’s end to fit the curved face of the other. Coping is a different fitting method, not a promise that every corner will fit better. Use that guide for the full process rather than treating a cope as another table setting.
How to cut quarter round outside corners
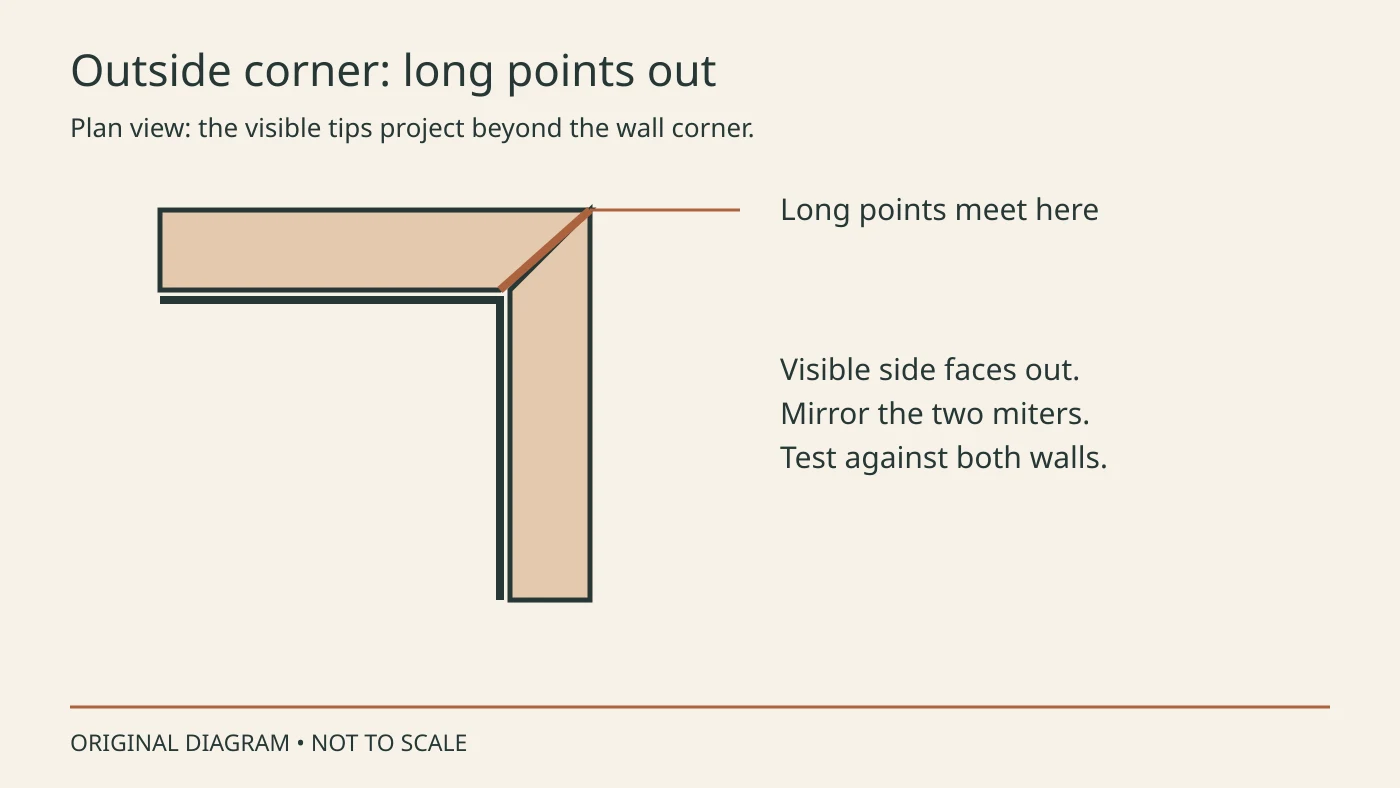
For an outside corner, reverse the paired cuts so the long points meet around the projecting corner. The long point is the tip that extends farthest along the piece. On quarter round at an outside corner, that tip is toward the curved, visible side, away from the wall.
Check two scraps against the actual outside corner before marking final lengths. Keep each back against its wall and each bottom on the floor during the fit check. Mark the point that your measurement refers to; a length to the short back edge is different from a length to the projecting long point. Check both the corner fit and where the far end must finish before cutting the full run.
Quarter round returns and square ends
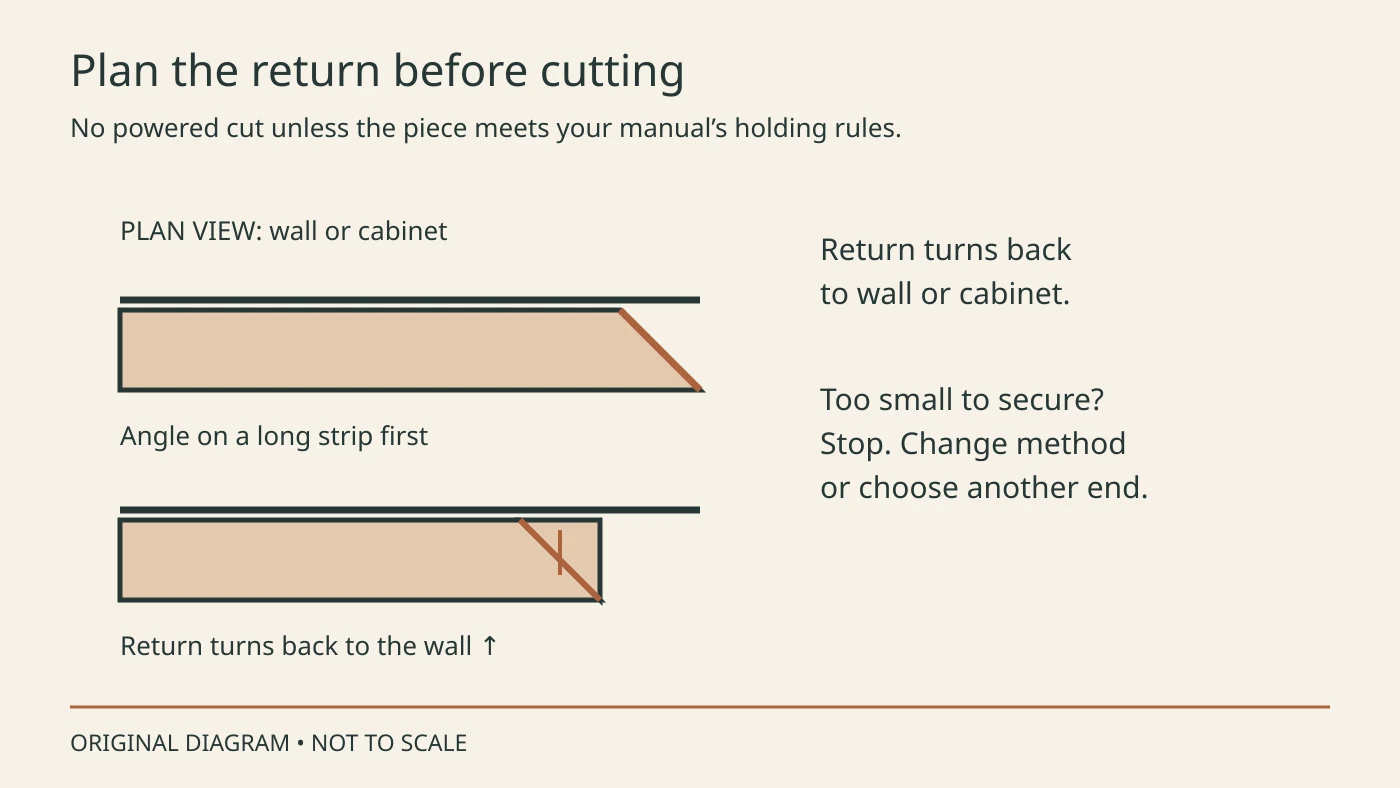
The diagram shows two end layouts. A square end is a straight cut across the strip. A return is a short piece that turns the curved profile back toward a wall or cabinet, closing the exposed end. The return may be too small to control on a powered saw even when the main strip is easy to hold.
Bosch’s GCM12SD manual states: “Do not use this saw to cut pieces that are too small to be securely clamped or held by hand.” Its general warning requires at least 4 inches (100 mm) between a supporting hand and either side of the blade. Its model-specific No Hands Zone extends 6 inches to each side of the blade path. These are Bosch examples. Follow the strictest applicable rule in your own manual.
Plan the return angle at the end of a long strip first. That does not make the later cut that releases the tiny piece acceptable. Before that cut, check whether the piece can be securely clamped or held with your hand outside the required zone. If it cannot, do not cut it on the miter saw. Choose another method allowed by its tool instructions, or choose a different end detail. Our small-piece cutting guide covers the decision; our miter-box comparison explains another tool type without making every small cut safe.
Join long runs with a miter splice
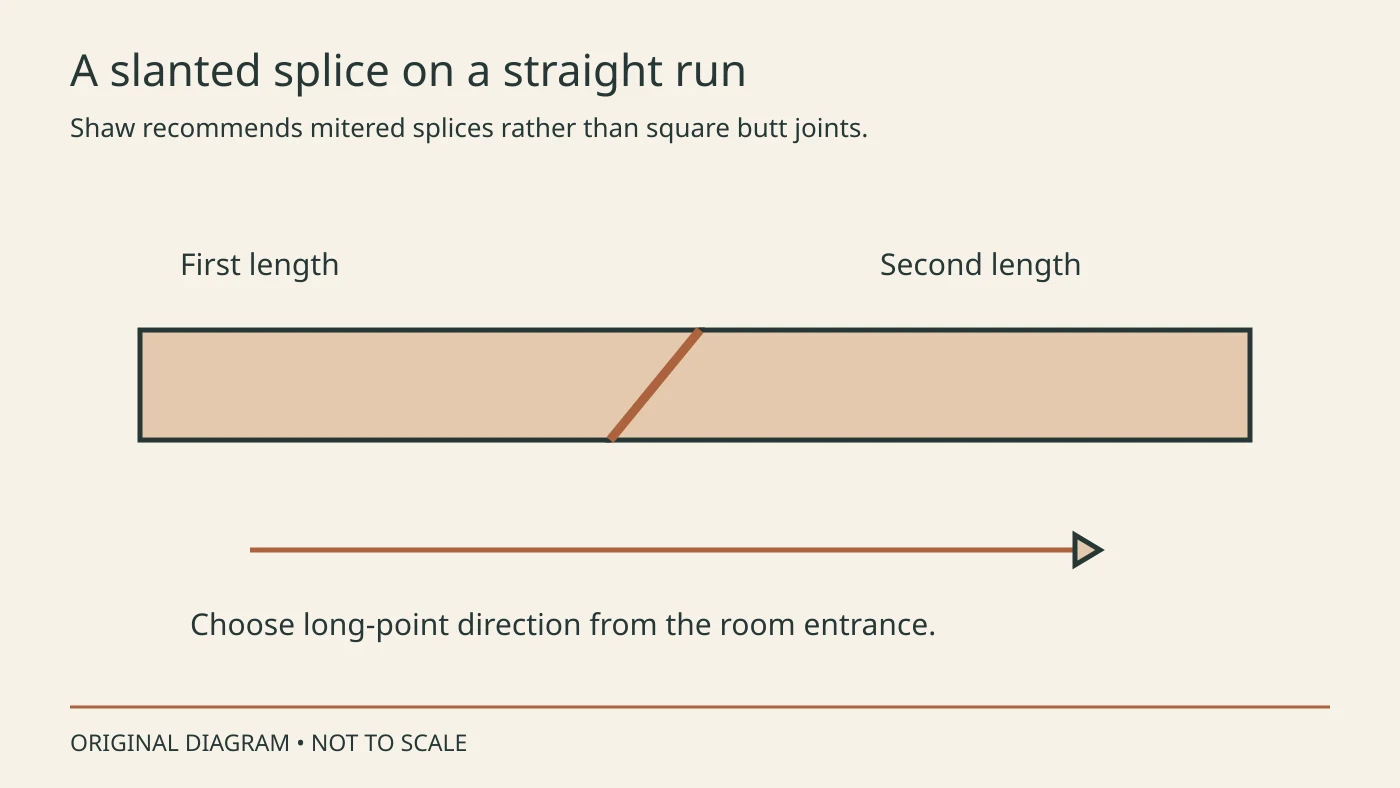
Shaw’s laminate molding instructions call for mitered joints rather than butt joints when joining trim lengths. A butt joint places two square ends together. A miter splice, also called a scarf joint, uses matching slanted ends to join a straight run. In this upright layout, make that slant by turning the miter table, not tilting the blade.
Shaw says to cut with the long point “oriented in the same direction as your natural line of vision when you enter the room.” Stand at the doorway and look along the wall. Aim the long point along that viewing direction, then mark it before taking the strips to the saw. Follow your flooring maker’s fastening instructions.
Fasten quarter round without pinning the floor
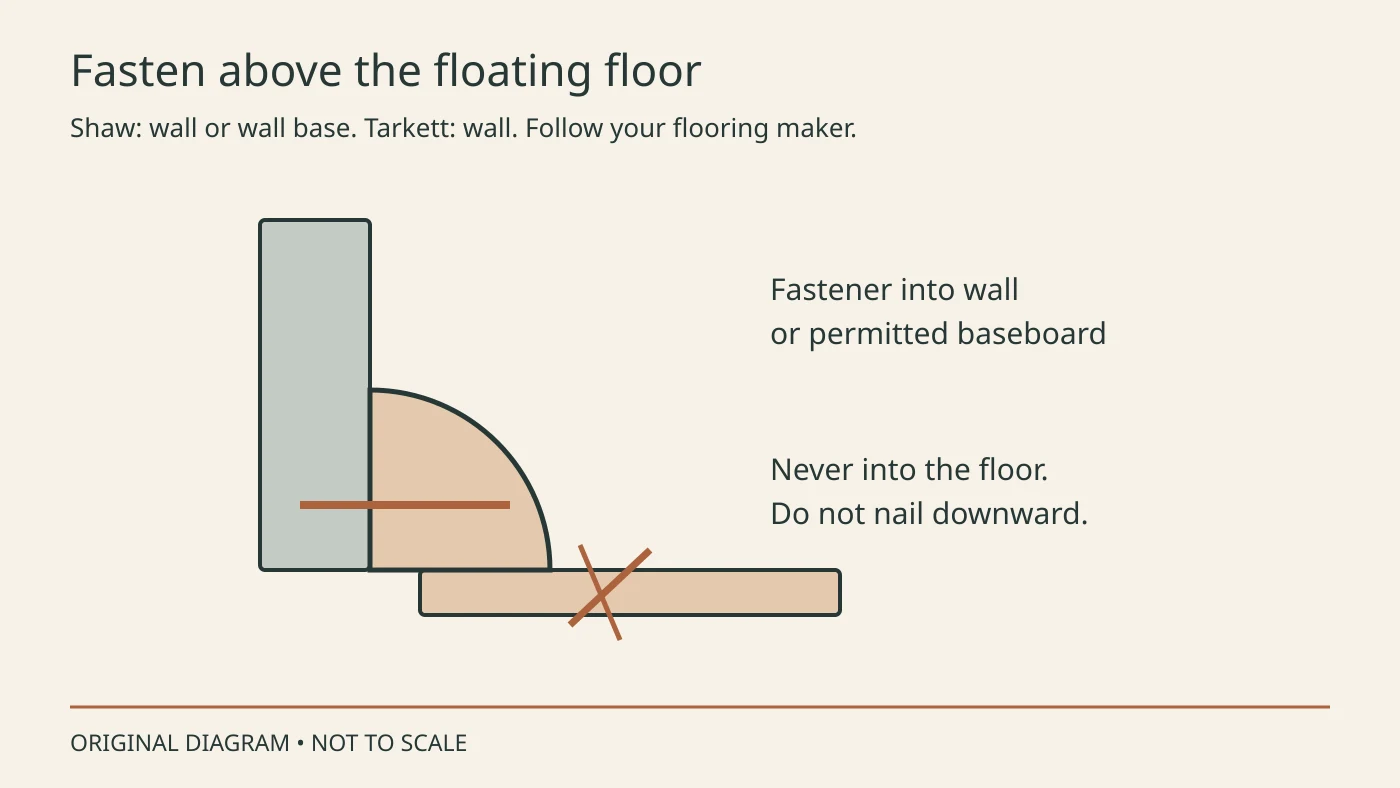
Shaw’s laminate molding instructions require pre-drilling when nails or fasteners are used, to avoid splitting. They also say never secure quarter round or wall base to the floor and warn against driving nails downward into it. A floating floor needs room to move; a fastener through the trim into the flooring defeats that movement.
The attachment point depends on the flooring instructions. Shaw says to nail quarter round into the wall or wall base. Tarkett says to fasten molding into the wall and not through the laminate. Follow your flooring maker rather than choosing whichever wording is easier. Our laminate-flooring saw guide covers the wider cutting plan; trim fastening must still follow the floor’s installation guide.
Shaw recommends silicone sealant in expansion zones in bathrooms and near kitchen sinks, dishwashers and refrigerators with icemakers. That is Shaw’s wet-area advice for its laminate instructions, not a sealant rule for every floating floor. For sealants or adhesives, follow your flooring and molding makers’ instructions rather than adding an unsupported glue step.
Choose a miter saw and blade for quarter round
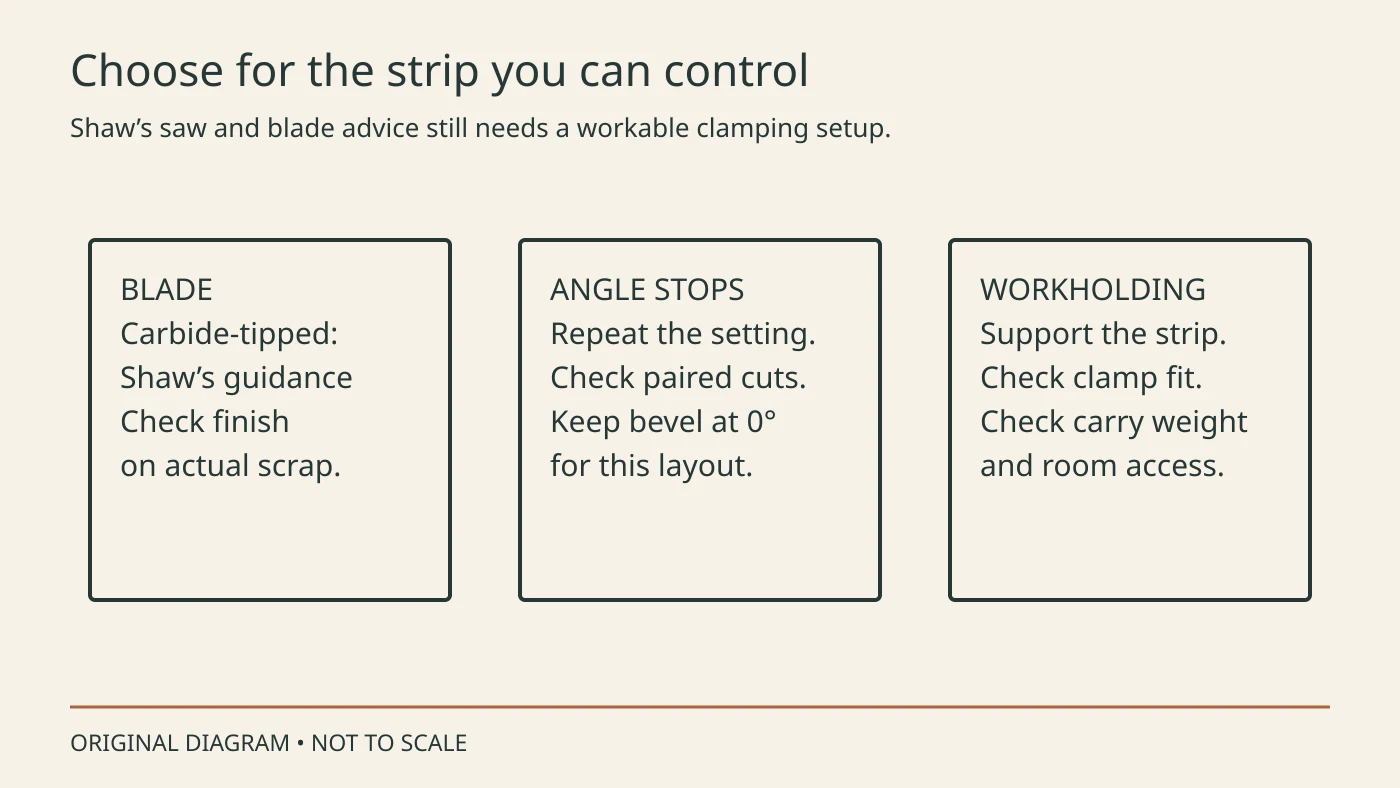
Shaw recommends a 10- or 12-inch motorized miter saw with preset adjustments for basic 22.5-, 45- and 90-degree miter cuts. It also recommends a carbide-tipped blade for finished cuts. The 7-1/4-inch DeWalt DCS361B below is smaller than Shaw’s recommended sizes. It is a separate compact option, not a match for that recommendation. Check your flooring instructions and the actual workholding setup before choosing.
Metabo HPT lists the C10FCG2 at 24 pounds with nine miter detent stops, a shadow line and an included vise assembly. DeWalt lists the DCS361B as a 30-pound, 20V MAX 7-1/4-inch slider with 11 positive stops. Those specifications offer two ways to plan a trim station. Compare how you will carry the saw to the room, set repeated angles and secure the actual strip before choosing.
A clean cut only helps if the piece stays controlled. Capacity is rarely the limiting issue for these small profiles; fine cut quality, usable clamps and repeatable angle stops deserve attention. Our blade tooth-count guide, trim-work saw guide and small-project saw guide explain those broader choices. The two options here are specification-based examples, not a tested ranking.
At a glance
What makes a clean quarter round job
- Keep the back against the fence and the bottom on the table.
- Test paired corner cuts in the actual room.
- Pre-drill trim as Shaw instructs.
Where quarter round jobs go wrong
- A tiny return may fail Bosch’s workholding rules.
- A square butt splice conflicts with Shaw’s guidance.
- Fastening into laminate conflicts with Shaw and Tarkett.
Frequently asked questions
Do you cut quarter round at 45 degrees?
For a true 90-degree corner, start with two mirrored 45-degree miters. Keep the bevel at 0 degrees in the upright position shown here. Measure and test the actual corner first.
How do you cut quarter round for corners?
Set the back against the fence and the bottom on the table. Cut mirrored ends and test two scraps in the room. Inside corners meet inward; outside corners put the long points toward the visible side.
Should quarter round be nailed to the floor or the baseboard?
Never nail it to the laminate floor. Shaw permits the wall or wall base; Tarkett directs fastening into the wall. Follow your flooring maker’s instructions, including its sealant or adhesive requirements.
What is the best tool to cut quarter round?
Shaw recommends a 10- or 12-inch motorized miter saw and carbide-tipped blade for molding. The actual piece must meet your saw’s support and clamping rules. Bosch prohibits cutting pieces too small to secure; change the method or end detail if needed.
Is quarter round the same as shoe molding?
The profiles differ. Alexandria Moulding’s catalog lists equal-sided quarter round, including 3/4 x 3/4 inch, and base shoe such as WM126 at 1/2 x 3/4 inch, with unequal sides. Check the actual profile and the gap your flooring maker requires it to cover.
Sources and verification
Specifications and material guidance were checked on the dates shown. Always confirm the current manual for your exact saw, blade and decking product.
- Shaw: installing laminate floor moldingsChecked October 19, 2026
- Tarkett: laminate installation guideChecked October 19, 2026
- Alexandria Moulding: WM105 quarter roundChecked October 19, 2026
- Alexandria Moulding: profile catalogChecked October 19, 2026
- Bosch GCM12SD: operating and safety instructionsChecked October 19, 2026
- OSHA: miter-saw guarding and safetyChecked October 19, 2026
- Metabo HPT C10FCG2: official specificationsChecked October 19, 2026
- DeWalt DCS361B: official specificationsChecked October 19, 2026